EasyCheck Help
Login Screen
How to Log In
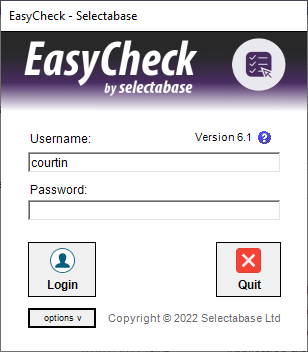
When you start EasyCheck , you will see the screen on the right.
Simply enter your username and password and press  to connect to the TPS Check system.
EasyCheck Options
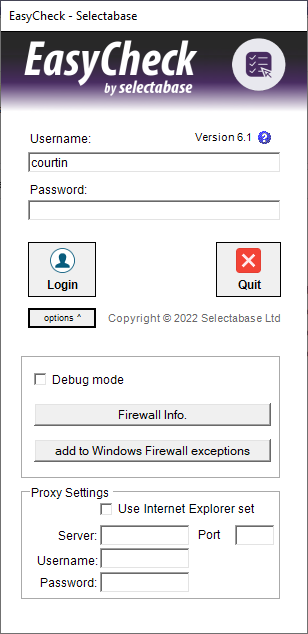
On some systems, you may need to change the way the software attempts to connect to the internet. You can do this by pressing 
The login dialog box expands as shown on the right.
Debug mode:
When the program runs in debug mode, the software will save the processed information into a small log file. This option is only useful if you are having some problems that need to be diagnosed by our development team. It is not recommended to run EasyCheck in debug mode unless asked otherwise by a member of our team.
Firewall Info:
Displays information about which firewall is running on the computer.
add to Windows Firewall exceptions:
This function will add the EasyCheck software in the Windows Firewall’s exception list, allowing it to access the internet.
Proxy settings:
Some networks give you access to the internet via a proxy server. If nothing is specified, EasyCheck will attempt to connect to the internet directly.
If you are using a proxy server,you can find the details by doing the following:
1 – Open Internet Explorer
2 – Go to Tools, and choose “Internet Options”
3 – In the “Connections” tab, click on “LAN Settings…”
4 – The details of your proxy serer should be shown.
If your proxy server requires a username and password, please contact your system administrator.
Menus
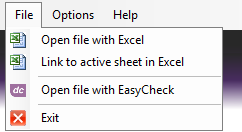
File Menu
You can choose either to open your data in Excel or within EasyCheck. The only difference is that by opening your data within EasyCheck the service will run slightly faster and you don’t need to have Excel installed on your computer.
Open data in Excel
Open file with Excel:
Allows you to search and open a Microsoft Excel file (*.xls or *.csv) and link it to the EasyCheck software.
Link to active sheet in Excel:
If you want to screen a Microsoft Excel worksheet which is already open, then select “Open active sheet” and it will be linked to the EasyCheck software.
Open and save data within EasyCheck (See the EasyCheck grid section)
Open a file with EasyCheck:
If you don’t have Excel and would like to run a slighter faster check, you can open a data file (*.xlsx, *.xls, *.csv) directly within the EasyCheck software.
Save EasyCheck file:
To save your results after using the EasyCheck software to open your data file, select “Save EasyCheck file” or click on the “Save” at the top of the application, then choose the file type you would to save your data in.
The order in which the rows are exported will depend on how it is displayed within the grid, and not necessarily numbered as indicated in the first column of each row.
Be aware that some Excel files have a number of row limits, depending of the file version (from about 16,000 to 1,000,000 rows). It may therefore be safer to export your file as a CSV or TXT file instead of XLS. Bear in mind though that non XLS file do not support cell colours. Be sure to flag your data using new columns in this case.
Other Option
Exit:
Close the EasyCheck software.
Options Menu
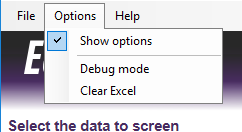
Show options:
Shows or hides the flagging options displayed at the bottom of the EasyCheck program.
Debug mode:
When the program runs in debug mode, the software will save the processed information into a small log file. This option is only useful if you are having some problems that need to be diagnosed by our development team. It is not recommended to run EasyCheck in debug mode unless asked otherwise by a member of our team.
Change Cell Colours: (Only when the file is open in EasyCheck)
Changes the colour of the cells currently selected in the EasyCheck grid.
Clear Excel:
At times, you may end up with a number of Excel instances running in the Background invisibly as they did not shut down properly. This function will close any “orphan” Excel processes, freeing system memory.
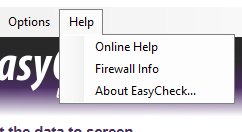
Help Menu
Online Help:
Opens your internet browser and goes to the online help.
Firewall Info:
Displays information about the firewall running on the computer.
About EasyCheck:
Displays information about the software.
EasyCheck Grid
If you don’t have Excel and would like to run a slighter faster check, you can open a data file (*.xlsx, *.xls, *.csv) directly within the EasyCheck software.
When you open a file within EasyCheck (See the Menus section), a grid will open on the right of the window, containing the data in your file.
Since EasyCheck uses a grid which is more powerful than using Excel to screen your data, the grid needs more memory. Working on large files may use up to 500MB of RAM. We recommend you not to open files with more than 50,000 rows in order to keep the software running at its best performance, which you can do by splitting your files into smaller ones.
Note: If you get an error stating “microsoft .ace.oledb.12.0 is not registered”, simply download the Microsoft Access Database Engine 2010 Redistributable
Grid appearance
Sort data:
When you open a data file within the EasyCheck grid, your data is at first displayed in the same order as in your file.
You can easily sort your data by clicking on the header of the column you want to sort by. For instance if you want to sort your data by Postcode, click on the column header containing the Postcode information. If you want to reverse the sort, click again on the column header.
To go back to the original order of your data, sort by the first column (“#”).
Cell colours:
Whilst you check your data within the software, the cells colours of the grid will change if you have checked the “Colour” box shown in Flagging Options (See the next sections to learn more about Flagging Options).
You may want to change a specific cell colour if you think that a row has been misflagged. In this case, go to the Options menu and click on “Change Cell Colours”.
Grid Data
Add a new row:
To add a new row to the EasyCheck grid, enter details into a new row in the very last row of the grid, which has a large “*” shown in the row header.
Delete a row:
To delete a row in the EasyCheck grid, click on the header of the row you want to delete, then press Delete. You can delete a range of rows as well by selecting several row headers.
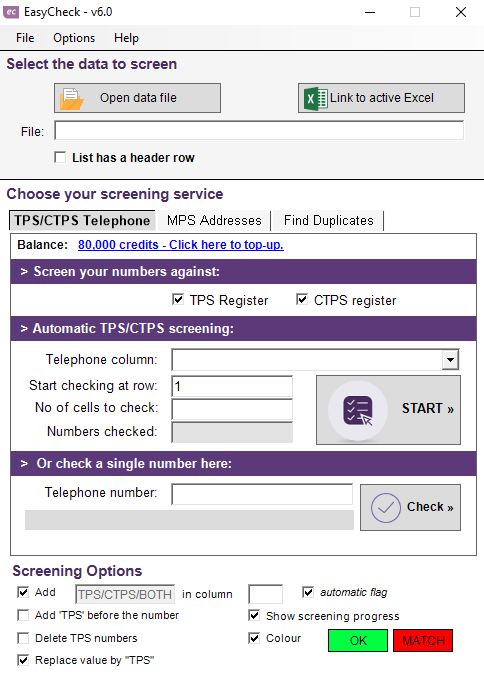
TPS Screening
Before you start screening your data, you need to open a file with Excel or EasyCheck (see the Menus section).
The  shows the title of the data file linked to the EasyCheck software (either open in Excel or in theEasyCheck grid).
List has a header row:
Tick this option if the first row of the data file contains the column headings or labels. These headings will then be used in the drop down selections used to map your data.
Automatic Screening
Screening against:
Allows you to choose which register (TPS, CTPS or both) to check your data against. Please note that you will be charge 1 credit per check per register.
Telephone:
Allows you to select which column contain the data to be screened against TPS/CTPS.
Start checking at row:
Indicates from which row EasyCheck will start the screening.
No of cells to check:
Indicates how many telephone numbers you wish to check. If the spreadsheet contains fewer numbers than you specified,EasyCheck will simply stop at the end of the spreadsheet.
Note: If the cell contains what seems to be an invalid number, it will be skipped. The system can screen numbers starting with +44, 0044, 0 or without a leading 0. Any non numerical characters contained in the cell will be stripped before being screened but won’t alter the values in your spreadsheet, i.e.: (01304) 123-456 is seen as 01304123456. The system will also strip any longer numbers to the first 11 digits only, i.e: 013041234567891011 is seen as 01304123456
Numbers checked:
Indicates how many numbers have been screened during the current process, and how many of which have been flagged.
Check:
Starts the screening process.
Check one number at a time
Simply type a number in the text box and click “Check”. The box below will indicate whether the number is TPS registered or not.
You can also select which register to perform the screening against. Please note that you will be charge 1 credit per check per register.
Flagging Options
The following options allow you to choose how the screening results are applied to your spreadsheet.
Add … in column: Add any value you like in a specified column (by default, the column the end of your spreadsheet is selected)
automatic flag: The application will flag the records as “TPS”, “CTPS or “TPS/CTPS” accordingly.
Add ‘TPS’ before the number: Add “TPS” in front of the telephone number.
Replace value by “TPS”: Replace the telephone number by the word “TPS”
Delete TPS numbers: Delete the telephone number from the spreadsheet
Colour: Change the colour of the cell
Show screening progress: In Microsoft Excel: When screening the data, the EasyCheck software changes the colour of the cells or rows being checked to a turquoise colour. If this is not needed then you can deselect this option. This is particularly relevant if you already have colouring within your spreadsheet that you do not wish EasyCheck to overwrite.
Within the EasyCheck grid: If checked, this option lets you see how the screening progresses by seeing your data being flagged during the process. If you want the screening to be faster, uncheck this option.
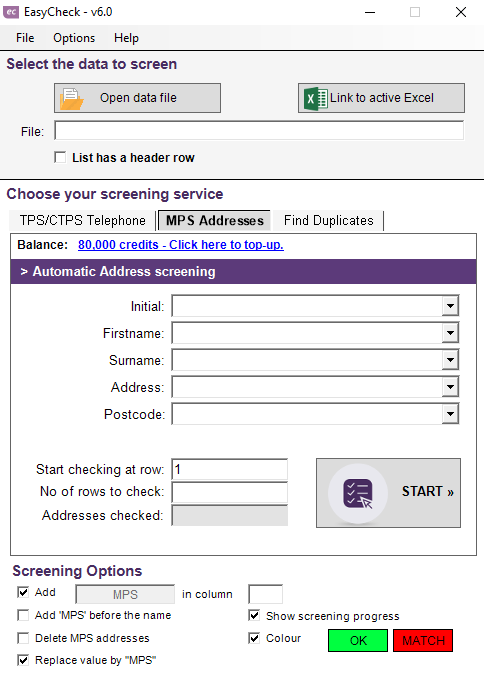
MPS Screening
Before you start screening your data, you need to open a file with Excel or EasyCheck (see the Menus section).
The shows the title of the data file linked to the EasyCheck software (either open in Excel or in theEasyCheck grid).
List has a header row:
Tick this option if the first row of the data file contains the column headings or labels. These headings will then be used in the drop down selections used to map your data.
Automatic Address Screening
Fields mapping:
You can perfom a MPS screening on Household, Surname, Firstname or Initial level:
– Household level: matching address and postcode.
– Surname level: matching surname, address and postcode.
– Firstname level: matching firstname, surname, address and postcode.
– Initial level: matching initial, surname, address and postcode. Note, if the “initial” field contains more than one letter, only the 1st letter will be used.
Please note that you will be charge 1 credit per check.
Start checking at row:
Indicates from which row EasyCheck will start the screening.
No of cells to check:
Indicates how many addresses you wish to check. If the spreadsheet contains fewer numbers than you specified,EasyCheck will simply stop at the end of the spreadsheet.
Addresses checked:
Indicates how many numbers have been screened during the current process, and how many of which have been flagged.
Check:
Starts the screening process.
Flagging Options
The following options allow you to choose how the screening results are applied to your spreadsheet.
Add … in column: Add any value you like in a specified column (by default, the column the end of your spreadsheet is selected)
Add ‘MPS’ before the number: Add “MPS” in front of the name.
Replace value by “MPS”: Replace the address by the word “TPS”
Delete MPS addresses: Delete the addresses from the spreadsheet
Colour: Change the colour of the cell
Show screening progress: In Microsoft Excel: When screening the data, the EasyCheck software changes the colour of the cells or rows being checked to a turquoise colour. If this is not needed then you can deselect this option. This is particularly relevant if you already have colouring within your spreadsheet that you do not wish EasyCheck to overwrite.
Within the EasyCheck grid: If checked, this option lets you see how the screening progresses by seeing your data being flagged during the process. If you want the screening to be faster, uncheck this option.
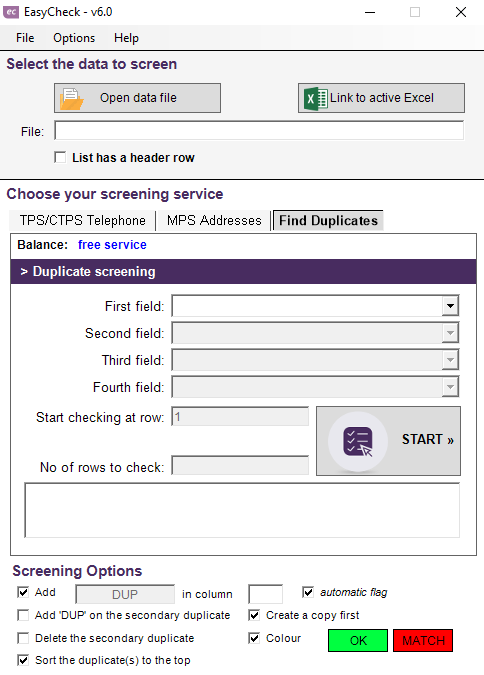
Duplicates Screening
Before you start screening your data, you need to open a file with Excel or EasyCheck (see the Menus section).
The File shows the title of the data file linked to the EasyCheck software (either open in Excel or in the EasyCheckgrid).
List has a header row:
Tick this option if the first row of the spreadsheet contains the column headings. Those headings will be used in the drop down selections used to map your data.
Select which fields you want to use for the deduping function. You can use up to four fields.
For example, you may want to find all records with the same first name, surname and postcode. You would map those columns respectively to the first, second and third dedupe field.
Check:
Starts the screening process.
The white box displays the screening progress and specifies in which phase the screening process is.
Flagging options
The following options allow you to choose how the screening results are applied to your spreadsheet.
Add … in column: Add any value you like in a specified column (by default, the column at the end of your spreadsheet is selected)
Add ‘DUP’ in the secondary duplicate: Add “DUP” in front of each cell of a duplicate.
Sort the duplicate(s) to the top: All the duplicates found will be displayed at the top of the spreadsheet to let you decide whether they are indeed duplicates or not.
Delete the secondary duplicate: If a row has a duplicate, every duplicate will be deleted from the spreadsheet, leaving only one record.
Colour: Change the colour of the cell
Create a copy first: (only in Microsoft Excel)
The spreadsheet that is open in Microsoft Excel will be copied into your workbook to avoid any data loss.
Show screening progress: (only in the EasyCheck grid)
If checked, this option lets you see how the screening progresses by seeing your data being flagged during the process. If you want the screening to be faster, uncheck this option.
Using Credits
When screening against the TPS, CTPS or MPS, 1 credit is debited per record per register, regardless of the result.